|
The Tablet Image Zooming Viewer enables viewing of high resolution
images of the tablets, which can be zoomed into - for example to
check the accuracy of readings. It relies on server and client software
developed by iSeeMedia.
Two Versions of the Viewer
There are two versions of the Tablet Image Zooming Viewer. The full (default)
version, which includes a magnifying glass tool that may be moved over the
tablet image,
requires you to have Java installed on your
computer (this may have been installed with your web browser, but not always).
NB: The
first time you use the full version of the Image Zooming viewer in a session
it will take a little while (depending on connection speed) to download the
Java applet.
If the full Java-based viewer does not work on your computer, there is an alternative
“Universal Viewer” version you can switch to using the
labeled button, which does not require Java (it also has lower system
requirements, if you have an old computer).
Recommended Minimum System Requirements
Whilst the Zooming Viewers will run on systems of a lower
specification (especially the Universal version), it is recommended that your
computer matches or exceeds the specifications given below to ensure smooth
operation.
Windows
- Windows 95/98/Me/NT/2000/XP (i.e. not Windows 3.x)
- Pentium II or better processor (especially if using Windows NT/2000/XP)
- 64Mb+ RAM (Win95/98/Me) or 128Mb+ RAM (Windows NT/2000/XP).
- 65, 000 colours minimum (24-bit true colour recommend)
For the (default) Java-based viewer, the following is also required:
- A Java 1.1 compliant browser, such as Netscape Navigator
® 4.75 or higher, or Internet Explorer ® 4.5 or higher
- If Java was not installed with the browser, you can download
the latest version from Sun.
Mac
- Max OS 8.5 or higher or Mac OS X)
- G3 or better processor (though a reasonably fast Power Mac should suffice)
- 64Mb+ RAM (Mac OS 8.x or 9.x) or 128Mb+ RAM (Mac OS X)
For the (default) Java-based viewer, the following is also required:
- Any Java 1.1 (or higher) compliant browser, such as Netscape Navigator
® 4.75 or higher, or Internet Explorer ® 4.5 or higher
- If Java was not installed with the browser and you're running a Mac OS
8.x/9.x, you can download the Mac
OS Runtime for Java.
- If Java was not installed with the browser and you're running Mac OS X,
you can download
the latest version from Sun.
Using the (Java) Tablet Image Zooming Viewer
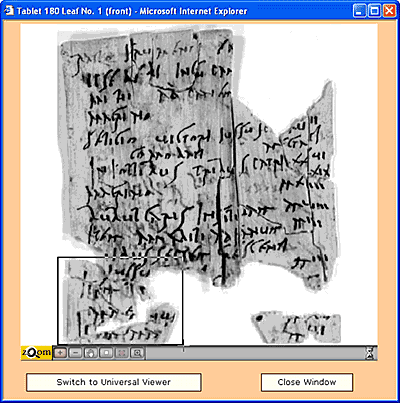
When the Tablet Image Zooming Viewer has finished loading, you should see a
window that looks something like this (assuming the Java Viewer
is working correctly - if it isn't and you don't see a tablet image,
either switch to the “Universal Viewer” version by clicking
on the button supplied, or download additional Java software, as
outlined above):
1. Tablet & Leaf Information
The information in the title bar gives the tablet number, the leaf number,
and (in parenthesis) whether the image is the front or back view
of the leaf. In the example given this appears as: Tablet
180 Leaf No. 1 (front)
2. Zoomable Image
This is the area in which the zoomable image is displayed. At maximum zoom
out the whole tablet leaf image is displayed. At maximum zoom in, only a
small fraction of the whole tablet leaf will be displayed, but at a high
level of detail.
Clicking or dragging in the
zoomable image area gives different results, depending on which of the
viewer toolbar buttons
was
clicked
last (see
below for
more information)
3. Viewer Toolbar
| Toolbar Button |
Function |
Alternative Keyboard Shortcut |

Zoom In |
Zooms
into the image. There are two ways this can used:
- Click Zoom In, then click the mouse anywhere in
the zoomable image area. Keep clicking the mouse button
to continue to zoom in.
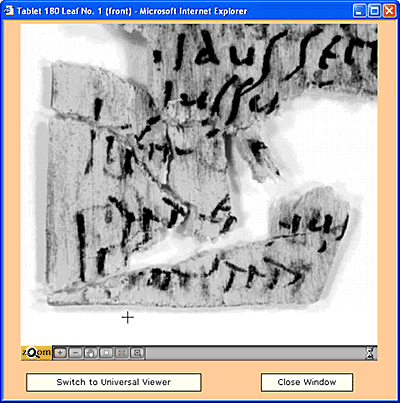
- Alternatively, if the Zoom In button is selected:
click and hold the mouse button down
anywhere in the zoomable image area, then drag out
a rectangle over the area you're interested in zooming
in on, then release the mouse button. The viewer will
then go straight to the maximum zoom possible that
can include all of the selected area of the image:

a) Dragging out the area to be zoomed in on

b) The selected area zoomed in
An egg-timer icon will appear on the far right hand
side of the toolbar (as in the images above) when image
information is being downloaded. How long the egg-timer
is displayed for will depend on your connection speed.
When the egg-timer disappears, all image information
for the image area displayed has been downloaded. Whilst
image information is being downloaded, the image may
initially appear to be "blocky", but will
then sharpen up as the detailed image information is
downloaded from the server.
NB: If you try to zoom past the maximum
image resolution, the Maximum Zoom icon  appears in the upper left corner of the viewer window.
 |
Page
Up |

Zoom Out |
Zooms
out of the image. Click Zoom Out, then click the mouse
anywhere in the zoomable image area. Keep clicking the
mouse button to continue to zoom out.
NB: You cannot zoom out further than
the original image size. |
Page
Down |

Pan Image |
Pans
across a zoomed-in image. Click Pan Image, then click
and hold the mouse button down anywhere
in the zoomable image area and drag to view a new segment
of the image. As with zooming-in, when moving to a new
part of the image, the image may initially appear to
be "blocky", but will then sharpen up as the
detailed image information is downloaded from the server
(image information downloading is represented by the
egg-timer icon, as detailed above).
NB: This will only work if you are
zoomed in to some degee i.e. not at maximum zoom out
(as you can already see the whole image at maximum zoom
out) |
Use
the Arrow keys to move 3 pixels at a time. Use SHIFT +
Arrow keys to move 15 pixels at a time. |

Initial View |
Returns
to the initial view after you've zoomed in, i.e. maximum
zoom out. |
V |

Show Hotspots |
Shows
any hotspot links. At present there are no hotspot links
defined in the images, so this button can be ignored. |
H |

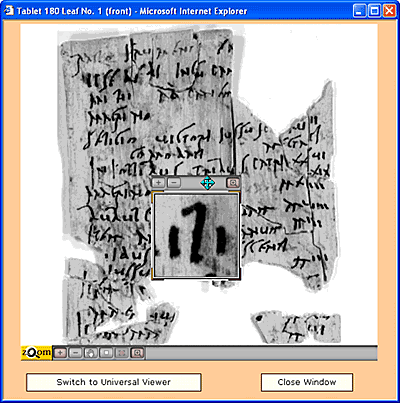
Magnifying Glass |
Magnifies
the area within the Magnifying Glass Tool. After clicking
the Magnify Glass button, the Magnifying Glass Tool should
pop-up over the zoomable image. Click and hold down the
mouse button down and drag the Magnifying Glass Tool to
magnify the desired section. The magnification level of
the image in the Magnifying Glass Tool can be increased
or decreased by clicking on the + and - buttons on the
Tool. To close the Magnifying Glass Tool, click on the
magnifying glass button on the top right-hand side of
the Tool.

Magnifying Glass Example
As with zooming-in, when moving the Magnifying Glass
Tool to a new part of the image, the image may initially
appear to be "blocky", but will then sharpen
up as the detailed image information is downloaded from
the server (image information downloading is represented
by the egg-timer icon, as detailed above). |
|

Viewer Information |
Goes
to the iSeeMedia website
(the vendor that produces the zooming software), where
more information about the zooming viewer can be obtained. |
I |
|
4. Toggle Viewer Type
Clicking the “Switch to Universal Viewer” button toggles the
viewer from the Java-based viewer (which may not work correctly on some systems)
to the HTML-Only “Universal Viewer”. When in the Universal Viewer,
this button will say “Switch to Java Viewer”, and will toggle
back to the (default) Java-based viewer.
5. Close Viewer Window
Clicking the “Close Window” button will close the Tablet Image
Zooming Viewer window.
Using the “Universal” Tablet Image Zooming Viewer
The Universal Viewer operates in a similar way to the the Java-based viewer,
though has some differences and less features (e.g. no Magnifying
Glass Tool etc.). However, it
does not require Java, and should work on a greater number of machines.Clicking
anywhere on the zoomable image will zoom-in one level near that point.
| Toolbar Button |
Function |

Zoom In |
Zooms
into the image. However, its probably easier to just
click on the area of the image you wish to zoom in on.
NB: When maximum zoom in has been
reached, the image will not zoom in any further. |

Zoom Out |
Zooms
out
NB: You cannot zoom out further than
the original image size. |

Vertical Pan |
Vertical
Pan. Clicking the upwards-pointing arrow part of this
button will pan up the image; clicking the downwards-pointing
arrow will pan down the image.
NB: This will only work if you are
zoomed in to some degee i.e. not at maximum zoom out
(as you can already see the whole image at maximum zoom
out) |

Horizontal Pan |
Horizontal
Pan. Clicking the leftwards-pointing arrow part of this
button will pan the image left; clicking the rightwards-pointing
arrow will pan the image right.
NB: This will only work if you are
zoomed in to some degee i.e. not at maximum zoom out
(as you can already see the whole image at maximum zoom
out) |

Initial View |
Returns
to the initial view after you've zoomed in, i.e. maximum
zoom out. |
|
To return to the Java-based viewer, click the "Switch to Java Viewer" button.
Printing Images from the Viewers
It is not possible to print images of the tablets directly
from the Java-based viewer. However, it is possible to
print from the Universal Viewer using the Ctrl-p keys (Command-p on a Mac).
Another alternative is to print out screenshots from either viewer
(see "Saving
Tablet Images" below).
Saving Tablet Images from the Viewers
It is not possible to save images directly from the Java-based viewer, however
it is possible to do a screenshot (e.g. by using a dedicated screen capture
program like SnagIt ®, or just pressing the "Print Screen" button on your keyboard, then pasting into a graphic manipulation program such as
Photoshop ®). Alternatively, it is possible to save views
of the tablet images directly from the Universal Viewer by right-clicking
(PC) or shift-clicking
(Mac) and selecting "Save Picture/Image As..." or "Download Image
to Disk".
Important Copyright Information
If saving and/or printing out the Vindolanda tablet images, please bear in
mind that the Vindolanda
tablet images are for personal and educational use only.
Educational institutions may reproduce and distribute these materials
for educational
use
provided credit and notification are given and the copyright notice is retained
on any copies made. Commercial use of these materials is prohibited without
prior written permission. For more information on this and also on how to obtain
larger digital images of the tablets, please see the Copyright
Information page.
|